Introduction
One of the initial explorations that started this book was how small and simple a compile-to-WebAssembly language implemented in JavaScript could be. Our first “WebAssembly compiler in a tweet” was 269 bytes; since then, we’ve managed to whittle it down to a measly 192 bytes.
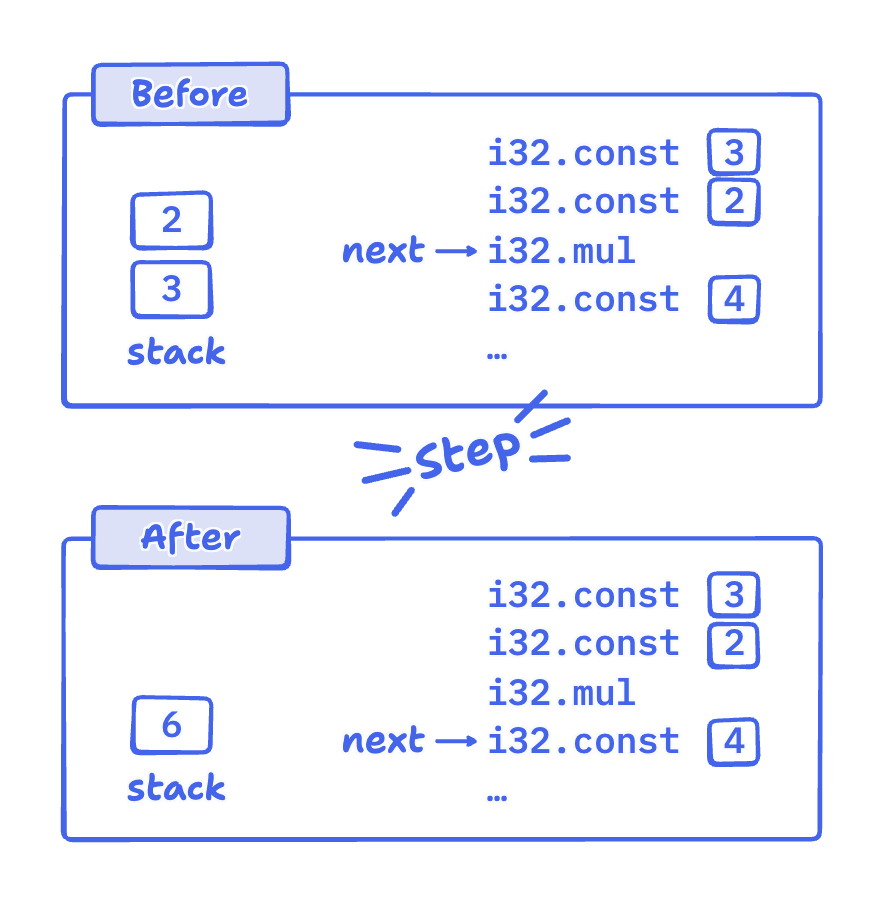
The final result is a compiler that takes an arithmetic expression — written in reverse polish notation — and compiles it down to a valid WebAssembly module. That module exports a single function which returns the result of the original arithmetic expression. Here it is:
let c=(b,l)=>WebAssembly.instantiate(new Int8Array(
[,97,115,109,1,,,,1,5,1,96,,1,127,3,2,1,,7,4,1,,,,10,
l=(b=b.split` `.flatMap(t=>t>-1?[65,t]:107+'-*/'.indexOf(t)))
.length+4,1,l-2,,...b,11]))
And here’s an example of how you can use it:
(await c('11 11 1 - + 4 * 2 /')).instance.exports['']()
But this is not just a clever trick — if you take the time to understand what this code does, you’ll learn a surprising amount about WebAssembly! In the rest of the post, we’ll explain how it all works by de-obfuscating the code one step at a time.
You can play with the code in this post here: stackblitz.com/edit/rpn-to-wasm-js-compiler.
Format
The first thing we can do to make it more readable is to format it:
, 97, 115, 109, 1, , , , 1, 5, 1, 96, , 1, 127, 3, 2, 1, , 7, 4, 1, , , , 10,
(l = (b = b.split` `.flatMap(
(t) => t > -1 ? [65, t] : 107 + "-*/".indexOf(t)
While it’s still pretty unreadable, now we can at least identify different parts of the code.
At a high level, what we’re doing is ‘parsing’ the expression in a very simple way, turning it into the appropriate Wasm bytecode,
and then hand-crafting the bytes for a single-function module.
In a more complex compiler you would probably use a library to generate the WebAssembly module and compile the expressions but our main metric
here is code size so we write the bytes directly in an array.
Remove Assignment Expression
The first trick to undo is the assignment expression.
In JavaScript the assignment operator is an expression. This means that it generates a result after evaluating, as you can see in the following examples:
console.log('a', a = 42);
The code above will output:
This is because a = 42 assigns 42 to a and the whole assignment expression evaluates to the value being assigned.
In a = b = 43, we assign the result of evaluating b = 43 to a. This equivalent expression may be easier to understand: a = (b = 43).
In our code, we use this trick to reuse variables and update their value in places where
we can also use the value being assigned. It also allows us to have our compiler in a single expression, avoiding the need for curly braces, semicolons and return statements.
To undo it, we turn the body of our function into a block and do each assignment on its own line:
(t) => (t > -1 ? [65, t] : 107 + "-*/".indexOf(t))
return WebAssembly.instantiate(
, 97, 115, 109, 1, , , , 1, 5, 1, 96, , 1, 127, 3, 2, 1, , 7, 4, 1, , , ,
10, l, 1, l - 2, , ...b, 11
Undo Variable Tricks
Now the assignments are easier to identify but the meaning of variables and function
arguments are still hard to understand. Let’s fix that by undoing a couple of variable tricks.
The first step is to stop using single letter variables, and to use more descriptive names instead. The next step is to stop reusing variables: for example, b initially holds the code to compile, but once we don’t need that any more we reuse it to hold the bytecode instructions.
To undo this we are going to introduce a new instrs variable and rename b to code. We’ll also rename l to len. This variable contains a value that is close to the number of bytecodes.
By declaring l in the body we can remove it from the function argument’s list. We did this
as a trick to avoid the need to declare it with let or const, saving some bytes and the need for a function body.
The trick works by adding unused arguments at the end of the function argument list and using them as local variables. Our compiler function expects a single argument with the code; l is there for us to use since we don’t expect the caller to provide any value for it.
Here’s the code without this trick:
const instrs = code.split` `.flatMap(
(t) => (t > -1 ? [65, t] : 107 + "-*/".indexOf(t))
const len = instrs.length + 4;
return WebAssembly.instantiate(
, 97, 115, 109, 1, , , , 1, 5, 1, 96, , 1, 127, 3, 2, 1, , 7, 4, 1, , , ,
10, len, 1, len - 2, , ...instrs, 11
Add Missing Zeros
If you look at the array in our code, you may notice that there are many commas followed by another comma instead of a value. This syntax defines “sparse arrays”. Here’s an example:
console.log(a1.length); // Output: 2
console.log(a1); // Output: [ <2 empty items> ]
Which is equivalent to:
console.log(a2.length); // Output: 2
console.log(a2); // Output: [ <2 empty items> ]
We use this syntactic trick to save one byte each time we need a 0 to appear in the array. This works because Typed Arrays coerce all array items to numbers, and an “empty item” will be converted to 0:
new Int8Array([0, null, undefined,,0])
which produces:
Int8Array(5) [ 0, 0, 0, 0, 0 ]
Let’s undo this trick by adding all the zeroes back:
const instrs = code.split` `.flatMap(
(t) => (t > -1 ? [65, t] : 107 + "-*/".indexOf(t))
const len = instrs.length + 4;
return WebAssembly.instantiate(
0, 97, 115, 109, 1, 0, 0, 0, 1, 5, 1, 96, 0, 1, 127, 3, 2, 1, 0, 7, 4, 1, 0, 0, 0,
10, len, 1, len - 2, 0, ...instrs, 11
Remove Extra 4 bytes on Length Definition
In our code, we have a variable len that contains a number that is close to the number
of bytecodes in the compiled expression, but not exactly the same:
const len = instrs.length + 4;
In the WebAssembly module we need to use the number of bytes in the function body (the expression to evaluate) in two places:
- To define the code section’s length
- To define the function body’s length
Since there’s only one function in the code section both values are similar:
- The section takes two extra bytes (section identifier and number of code entries)
- The function body takes another two bytes (number of locals and
end instruction)
To avoid writing b.length twice we assign to l the value of b.length + 4 in the place where we need the code section byte count
and then calculate l - 2 (b.length + 2) where we need the function body byte count.
l=(b=b.split` `.flatMap(t=>t>-1?[65,t]:107+'-*/'.indexOf(t))).length+4,1,l-2
This is all a trick to avoid having to write b.length twice.
let’s assign the length to len and calculate the right value in each place:
const instrs = code.split` `.flatMap(
(t) => (t > -1 ? [65, t] : 107 + "-*/".indexOf(t))
const len = instrs.length;
return WebAssembly.instantiate(
0, 97, 115, 109, 1, 0, 0, 0, 1, 5, 1, 96, 0, 1, 127, 3, 2, 1, 0, 7, 4, 1, 0, 0, 0,
10, 4 + len, 1, 2 + len, 0, ...instrs, 11
Remove String Template Literal Instead of Function Call
The next trick to undo is code.split` `. In this case, we use the Tagged Template feature of String Template Literals.
Let’s see how it works by creating a simple tagged template that turns the string to uppercase:
return s[0].toUpperCase();
And use it:
As you can see, the first argument to the tagged template function is an array. Luckily for us, the first argument of String.prototype.split is handled in the following way:
All values that are not undefined or objects with a [Symbol.split]() method are coerced to strings.
And coercing an array with one string in it is the same as the string itself:
Since the function we want to call takes a single string argument, we can use it as a tagged template and save the parentheses in the function call.
Let’s write it as a function call instead:
const instrs = code.split(' ').flatMap(
(t) => (t > -1 ? [65, t] : 107 + "-*/".indexOf(t))
const len = instrs.length;
return WebAssembly.instantiate(
0, 97, 115, 109, 1, 0, 0, 0, 1, 5, 1, 96, 0, 1, 127, 3, 2, 1, 0, 7, 4, 1, 0, 0, 0,
10, 4 + len, 1, 2 + len, 0, ...instrs, 11
Remove the Ternary Operator
Next, let’s undo the Ternary Operator and turn it into an if statement.
The ternary operator has expressions on each branch saving us the return statements. Here’s what the code looks like when we use an if statement instead:
const instrs = code.split(" ").flatMap((t) => {
return 107 + "-*/".indexOf(t);
const len = instrs.length;
return WebAssembly.instantiate(
0, 97, 115, 109, 1, 0, 0, 0, 1, 5, 1, 96, 0, 1, 127, 3, 2, 1, 0, 7, 4, 1, 0, 0, 0,
10, 4 + len, 1, 2 + len, 0, ...instrs, 11
Remove Number Check With Coercion
The next trick to undo is the one present twice in the following code:
First we use coercion in t > -1 to check if the token t is a string representing a
positive number. Then we use coercion again in [65, t] to let JavaScript turn t into a Number in the Int8Array:
new Int8Array([65, '42'])
The code above evaluates to:
Let’s write the parsing and checking explicitly:
const instrs = code.split(" ").flatMap((t) => {
const num = parseInt(t, 10);
if (Number.isFinite(num)) {
return 107 + "-*/".indexOf(t);
const len = instrs.length;
return WebAssembly.instantiate(
0, 97, 115, 109, 1, 0, 0, 0, 1, 5, 1, 96, 0, 1, 127, 3, 2, 1, 0, 7, 4, 1, 0, 0, 0,
10, 4 + len, 1, 2 + len, 0, ...instrs, 11
The semantics of our compiler change a little bit here. The original version will only accept
positive integers as input; if you want a negative number you have to subtract from zero: 0 - 1 to get -1. The new version allows negative numbers since it checks with Number.isFinite(num) instead of t > -1.
Remove indexOf -1 Trick
The next trick is in the else branch:
return 107 + "-*/".indexOf(t);
Our calculator compiler only accepts four arithmetic operations: +, -, *, and /. But
in the code above you can only see three: -*/ and a magical number: 107. Here’s how it works — these are the bytecode numbers for arithmetic operations in WebAssembly:
+: 106-: 107*: 108/: 109
We only enter this branch if the token t is not a number, which means it can only be
one of the arithmetic operators above. So, given a single character which is one of those four operators, we want to produce the appropriate opcode.
We could have written 106 + "+-*/".indexOf(t). That is, we find the symbol’s index in the string:
…and add 106 to it to get the bytecode number. But when t is not in the string, "+-*/" indexOf returns -1. We can use that to our advantage, and treat -1 to mean “plus or any other token”:
+: -1 (any other token will be -1 too)-: 0*: 1/: 2
And that’s why we add 107 instead of 106. Let’s undo the -1 trick:
const instrs = code.split(" ").flatMap((t) => {
const num = parseInt(t, 10);
if (Number.isFinite(num)) {
return 106 + "+-*/".indexOf(t);
const len = instrs.length;
return WebAssembly.instantiate(
0, 97, 115, 109, 1, 0, 0, 0, 1, 5, 1, 96, 0, 1, 127, 3, 2, 1, 0, 7, 4, 1, 0, 0, 0,
10, 4 + len, 1, 2 + len, 0, ...instrs, 11
Here again the semantics change a little bit. Before, if the token t wasn’t found, the expression would evaluate to 107 + -1 which would map to an addition. Now it will evaluate to 106 + -1 which will map to bytecode 105 which is the popcnt instruction.
But don’t worry, we’ll fix it in the next step.
Remove indexOf Trick
After explaining how the indexOf trick works and removing the -1 part, let’s
go ahead and remove the trick completely. To do it we are going to create an object that maps from an arithmetic operation token to its bytecode:
const instrs = code.split(" ").flatMap((t) => {
const num = parseInt(t, 10);
if (Number.isFinite(num)) {
return OP_TO_BYTECODE[t] ?? 106;
const len = instrs.length;
return WebAssembly.instantiate(
0, 97, 115, 109, 1, 0, 0, 0, 1, 5, 1, 96, 0, 1, 127, 3, 2, 1, 0, 7, 4, 1, 0, 0, 0,
10, 4 + len, 1, 2 + len, 0, ...instrs, 11
To keep the initial semantics, if the token is not a valid operation we return the bytecode for +: in OP_TO_BYTECODE[t] ?? 106.
Remove the Empty Export Name
From the usage example at the beginning of the post, you may have noticed that the exported
function’s name is the empty string:
(await c('11 11 1 - + 4 * 2 /')).instance.exports['']()
We did this to save us the bytes needed to specify the export name,
but also to save an extra byte/character in the code because with the length of the export name being 0
we can use the sparse array syntax to leave an empty spot in the WebAssembly module array.
To revert this trick we are going to name the exported function as a, which in UTF-8 is the byte 97:
> new TextEncoder().encode('a')[0]
const instrs = code.split(" ").flatMap((t) => {
const num = parseInt(t, 10);
if (Number.isFinite(num)) {
return OP_TO_BYTECODE[t] ?? 106;
const len = instrs.length;
return WebAssembly.instantiate(
0, 97, 115, 109, 1, 0, 0, 0, 1, 5, 1, 96, 0, 1, 127, 3, 2, 1, 0, 7, 5, 1, 1, 97, 0, 0,
10, 4 + len, 1, 2 + len, 0, ...instrs, 11
We can now call it with a nicer name:
(await c11('11 11 1 - + 4 * 2 /')).instance.exports.a()
Implicit Design Decisions
Our initial implementation only supported positive numbers, but that’s not the only number restriction in our compiler.
To keep WebAssembly modules as small as possible, numbers are encoded using a variable-length encoding algorithm called LEB128. You can tell we are not implementing the whole algorithm by looking at the part of the code that encodes numbers: [65,t]. We’re assuming the number being encoded fits in 7 bits, the shortest possible LEB128 representation.
Let’s try the limits of our implementation:
(await c('63')).instance.exports['']();
(await c('64')).instance.exports['']();
This means the only numbers that will be parsed correctly are from 0 to 63.
(await c('127')).instance.exports['']();
(await c('128')).instance.exports['']();
Fails with:
Uncaught CompileError: WebAssembly.instantiate(): Compiling function #0 failed: function body must end with “end” opcode @+33
In the last one we went over the 7 bits and the module was rejected during validation.
Explaining and implementing LEB128 takes a lot of text and code. If you want to read more
about it we have a whole deep dive on LEB128 in our book.
A Trick that Almost Worked
During the code golfing phase I had a literal shower thought but sadly it didn’t work.
The idea was to simplify 106 + "+-*/".indexOf(t) by using the UTF-8 character code plus an offset like this: 63 + t.charCodeAt() and saving 3 bytes in the process. The reason it didn’t work is that the characters +-*/ don’t appear in the same order in UTF-8 and WebAssembly bytecode.
Explaining the Numbers in the Array
The last part to expand/explain is the array of numbers used to build the WebAssembly module.
It takes a big part of a specification to explain every byte in the array, but here’s a commented version that should give you a high level idea of what each part does:
// Wasm module magic number '\0asm'
// ----- type section -----
5, // Section size in bytes
1, // Number of entries that follow
// type section - entry 0
0, // Number of parameters
1, // Number of return values
// ----- function section -----
2, // Section size in bytes
1, // Number of entries that follow
// function section - entry 0
0, // Index of the type section entry
// ----- export section -----
5, // Section size in bytes
1, // Number of entries that follow
// export section - entry 0
97, // String as utf-8 bytes for 'a'
0, // Export type `function`
// ----- code section -----
10, // Section identifier
4 + len, // Section size in bytes
1, // Number of entries that follow
// code section - entry 0
2 + len, // Entry size in bytes
0, // Number of local variables
Conclusion
There you go! We’ve turned a rather opaque 192-byte snippet into something that’s almost readable. And in the process, you hopefully learned a little bit about WebAssembly.
If we dropped the size restrictions, there are lots of things we might want to improve in this compiler: handle numbers greater than 127, add nicer syntax, add support for conditionals, loops, etc. If you’re interested in what that might look like, I encourage you to check out our book WebAssembly from the Ground Up. You’ll learn the ins and outs of WebAssembly by writing a real compiler for a simple programming language. It’s a lot of fun!
Special thanks to lexi for contributing some of the tricks used above.